Add images to your page
Here you can learn how to add images or graphics to your page. Images and graphics can help make your message clearer and more engaging — but they should be used thoughtfully. Before adding an image, always ask yourself:
- Does the image tell the user something and serve a purpose on the page? Images and graphics should not be used just as filler.
- Evaluate whether it makes sense to display your graphics on, for example, a smartphone, or if they should be written as text instead.
- Always check how your images appear in responsive design if you want them presented in a specific way.
If you want to use your image in a graphic element, refer to the guide Banners and buttons.
Insert image
Insert image
1.Click the + Create new content or + Content button to add a new element. This will display the various elements you can insert on the page.

2. To insert images on the page, you can choose either the Text & Images element, the Images Only element, or the Text & Media element.

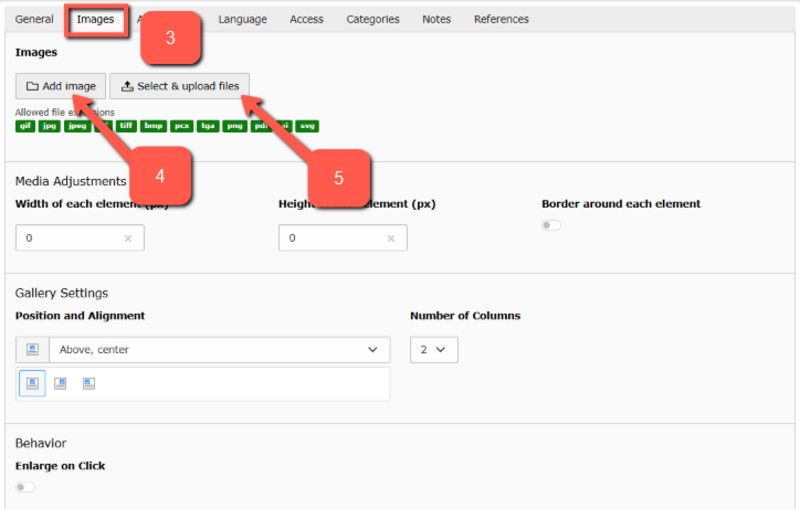
3. To add images to your page, go to the Images tab in the content element you've selected.
Note: Before uploading to TYPO3, reduce the image size using an editing program. Images should be no larger than 1 MB. Large images slow down your website, lower its ranking in Google search results, and have a a bigger climate impact.
4. Recommended method: Click Add image to use an image from the TYPO3 filelist via the file selector. There are two options:
- Image already uploaded: Select the folder where the image is located and click on the image to insert it into your page.
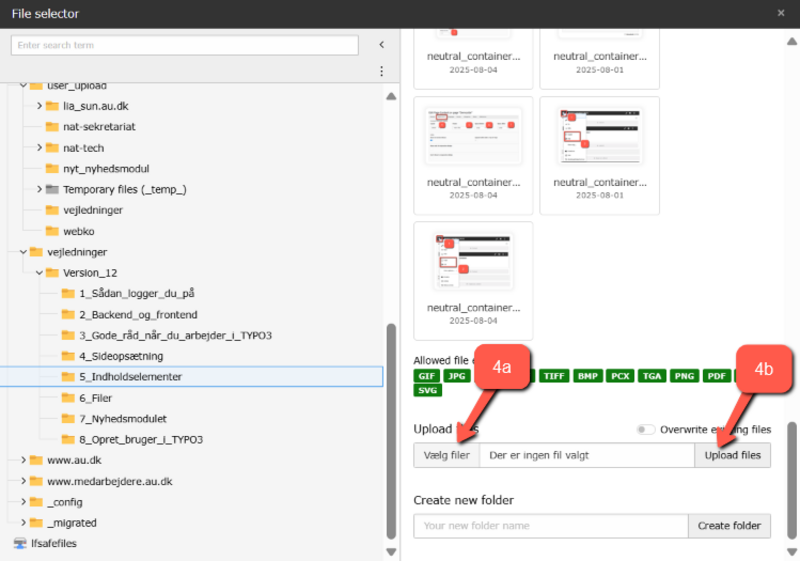
- Image not uploaded yet: Select the folder in the filelist where you want to save the image. Click Select files (4a) at the bottom right of the file selector. Choose the image from your computer’s file explorer, then click Upload files (4b). Now you can click on the image you just uploaded to insert it into your page.
This method is recommended. When you upload images to the filelist, you maintain an overview of all used images, and you and other editors can easily find and reuse them.
5. Alternative method: Click Select & upload files. Choose an image directly from your computer’s file explorer and upload it. Images uploaded this way are automatically placed in the folder no_folder_selected.
This method is not recommended. Uploading files to no_folder_selected makes it difficult to keep track of images and find them again later.
Position, size, metadata
Position, size, metadata
Once you have inserted your image in the Images tab, you are ready to choose the position, add a caption, and so on.
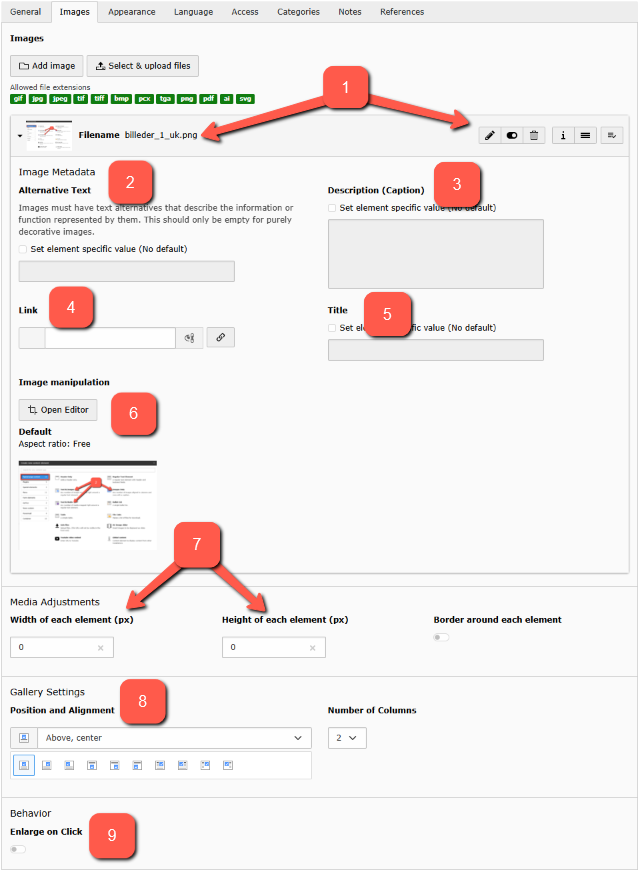
- Filename: When an image is uploaded, the filename of the uploaded file can be seen in the gray bar. After clicking Save, additional icons will appear in the gray bar. On the far right of the bar, you can click the trash can icon to delete the image or hide the image by clicking the Hide element button. The icon with three small lines allows you to move images around on the page (using drag-and-drop). Clicking the "i" will open an overlay with more information about the image. Avoid clicking the pencil icon.
- Alternative Text: Alternative text must be filled out by all public institutions unless your image is purely decorative, in which case you do not need to provide alternative text. Check the box for Set element specific value and provide an alternative text for the image. The text is not visible in the frontend but is used by search engines to index images and by assistive technologies for, e.g., visually impaired users. It should not be a long text but a short and precise description of what is happening in the image. If there is a link on the image (see point 4), it should also be included in the Alternative Text.
- Description (Caption): Also known as Caption. Check the box for Set element specific value to be able to write in the field. The description will be displayed directly under the image in the frontend. It can be a brief description of the image and credit for the photographer, e.g., "Photo: Lars Kruse, Aarhus University."
- Link: In the Link field, you can insert various types of links. For example, you can insert a URL to a page. When the image is clicked in the frontend, users will be directed to that page. You can type the URL in the field or click the small pencil at the end of the field. Clicking the pencil will also allow you to insert a link to a page in your site tree, a file from the filelist, or an email address. Note: If you insert a link, the Enlarge on Click function will be disabled.
- Title: The text in the title field is visible in the frontend when hovering over the image. It can be a brief description and information about what happens if the image is clicked.
- Image Manipulation: You can open the image editor and refer to the guide on Cropping images for further instructions.
- Media Adjustments: If you need to change the image size from its uploaded dimensions, fill in the Width and Height fields with values in pixels (px). If you enter a width, the height will adjust proportionally and vice versa. Therefore, enter EITHER width OR height.
- Gallery Settings: If you have selected the Text & Images element, you can position your image in relation to your text under Position and Alignment.
- Enlarge on click: If enlarge on click is enabled, users can click on images in the frontend to view them in a larger size. The display depends on the size in which you uploaded your image but will be shown at a maximum width of 800 px. Note: If you enter links in the image link field, the Enlarge on click function will be disabled.
Do not show (or show only) image in responsive design
Do not show (or show only) image in responsive design
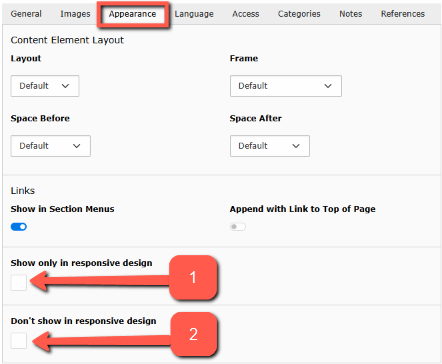
Always check how your images appear in responsive design, i.e., on smaller screens like mobile phones. If the dimensions of your image make it difficult to display optimally in responsive design, you can choose between two options under the Appearance tab:
- Show only the image in responsive design.
- Do not show the image in responsive design.
Example: You create two elements with different images. One is shown only in responsive design and therefore not visible on desktop. The other is not shown in responsive design and therefore visible only on desktop.
Example: You might choose not to display the image in responsive design (e.g., if it is just decorative).
Rights to Images
Make sure you have the proper rights to use any images you upload to your website. This is important because using images online is subject to copyright law. Read more about common pitfalls in the copyright and crediting section.