Text editor
TYPO3's text editor is a key tool for daily work. It functions like any other editor, and most buttons resemble those you know from, for example, Word. You can insert quotes, links to content, pages, or files, as well as create tables, bullet points, etc.
- If you hover your mouse over a button, a small popup will appear, informing you of the button's function.
- Many common keyboard shortcuts can also be used in TYPO3's editor, such as Ctrl+b (bold), Ctrl+i (italic), Ctrl+c (copy), Ctrl+v (paste), Ctrl+x (cut), and Ctrl+z (undo). Below, we will go through all the icons in the editor.
- As an editor, you cannot freely choose font type, color, and font size, as the design follows AU's guidelines.
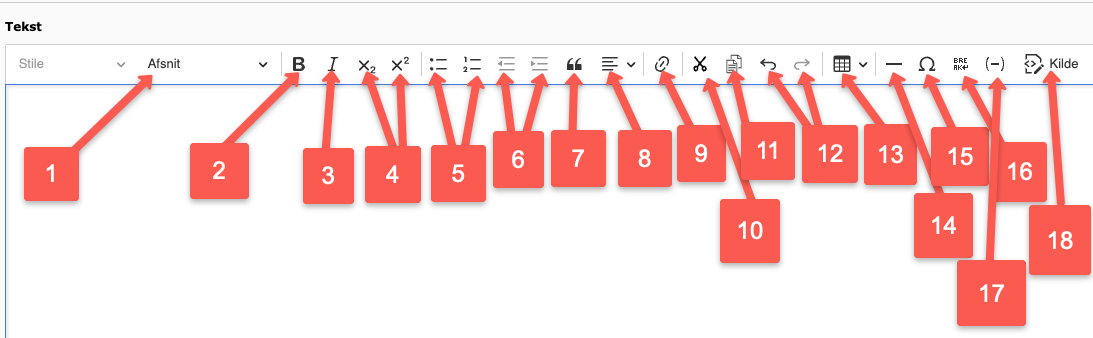
Description of Icons
Description of Icons
- Choose Formatting: You can select a portion of text and specify whether it should be normal body text (Afsnit) or a heading. There are 5 heading levels to choose from (Heading 1 is reserved for the page title).
- Bold: Highlight text and click B or use the shortcut Ctrl+b to make the text bold. The formatting can be removed with the same shortcut.
- Italic: Highlight text and click I, or use the shortcut Ctrl+i to make the text italic. The formatting can be removed by using the same shortcut.
- Subscript/Superscript: Highlight the text you want to lower or raise and click the icon. The formatting can be removed by clicking the icon again.
- Bullet Points: You can choose between numbered or bulleted lists.
- Decrease or Increase Indent: You can create multi-level lists using indentation, similar to Word. The icons become available only when a list is created and the cursor is placed within the list. Indentation cannot be used in normal body text.
- Blockquote: Highlight the text you want to emphasize and click the blockquote icon. The text will now be significantly highlighted.
- Alignment: Text can be aligned to the right or left, centered, or justified with equal margins on both sides, just like in Word
- Insert, Edit, or Remove a Link: You can link to a page in your site tree, an element on a page, a file, insert an external web address (URL), insert an email, or insert a phone number. The link text you highlight should be informative about the destination—what you are linking to. See a more detailed guide on links under Create Link to Page, Element, File, URL, Email, or Phone Number on this page.
- Cut: Highlight text and click the scissors icon or use the shortcut Ctrl+x to cut the text to the clipboard. You can then paste the cut text elsewhere.
- Copy: Highlight text and click the copy icon or use the shortcut Ctrl+c to copy the text to the clipboard.
- Undo or Redo Recent Action: The shortcuts Ctrl+z and Ctrl+y can also be used.
- Table: Click 'Insert Table' or edit an existing table.
- Horizontal Line: Inserts a horizontal line (the same width as your text). Use it thoughtfully, as it can be confused with other design elements on the page.
- Insert Special Characters: Here you will find, for example, letters not included in the Danish alphabet.
- Break: Use this to insert a break on the page
- Insert Soft Hyphen: Used to break long words neatly in the frontend. It can help with word breaking, e.g., in tables.
- Toggle HTML View On/Off: You can choose to view the HTML code underlying the text in your content element. Normally, you don’t need to worry about this, but sometimes it’s easier to edit directly in the HTML code (e.g., if you need to remove an empty heading <h3></h3>).
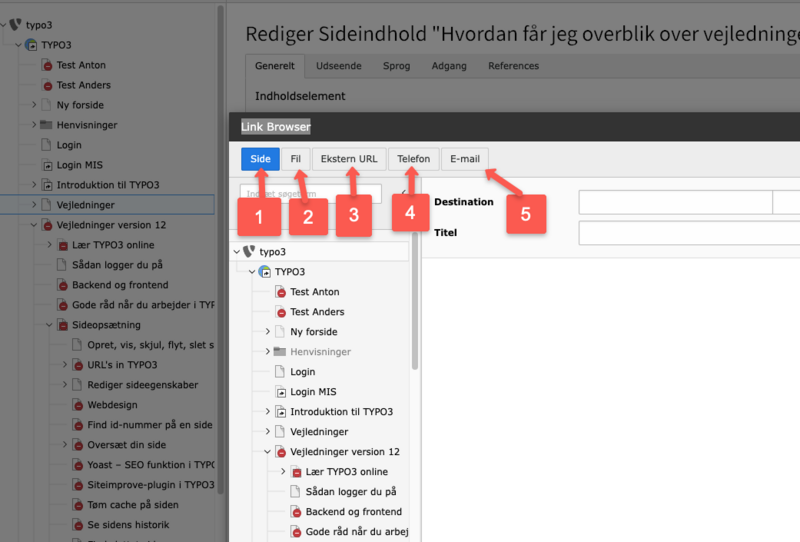
Create a link to a page, element, file, URL, email, or phone number
Create a link to a page, element, file, URL, email, or phone number
Highlight the text you want to turn into a link. Click the link icon in the text editor. Now, choose one of the following options:
- Link to a page in your site tree: Navigate to the desired page and select it by clicking the page title in the site tree. You can also link to a specific element on the page: Click the small black arrow next to the page icon in the site tree to reveal the page’s elements. This allows the element to function as an anchor or bookmark. This is known as deep linking. If you know both the page ID and element ID you want to link to in your site tree, you can insert page-id#element-id (e.g., 1613#9567) in the External URL tab (option 3).
- Link to a file in Filelist:
- If the file has already been uploaded in the Filelist module, select the file in the File tab. There is no search field here, but you can use the browser's Ctrl+F function to find and select the file.
- If you want to upload the file now and link to it: Select the folder where the file will be stored. At the bottom of the folder, you have the option to click Choose Files and Send Files. After uploading the file, use Ctrl+F in the browser to find and select the file.
- If you see a reference to your file in Filelist but don't know from which page it is linked, check the guide under Files: Find the element, linking to your file.
- Link to an external URL: Enter the URL of the page you want the link to lead to. This could be a page on one of AU's websites that you don't have access to in your site tree and therefore cannot navigate to, or it could be an external website. Note: If you know both the page ID and element ID you want to link to in your site tree, you can insert page-id#element-id (e.g., 1613#9567) in the External URL tab. You can also insert file:file-id (e.g., file:3069) in the External URL tab, and TYPO3 will automatically link to your file with ID 3069.
- Link to a phone number: When the user clicks on the number link, they will be prompted to choose an app for the task.
- Link to an email address: When the user clicks on the mail link, their email program will open.
Create a link to an element on another website
Create a link to an element on another website
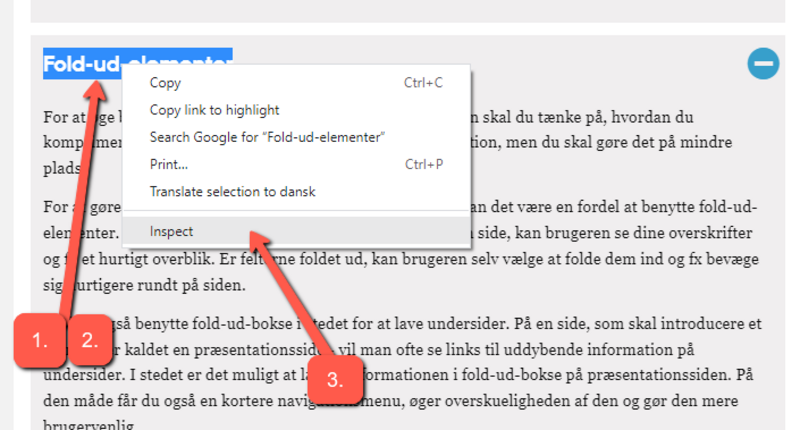
If we want to create a link to an element on a page that we don't have access to in the backend, we need to look at the page's code to find the element's ID. All browsers have a built-in tool that can be used for this. Open the page's URL in a browser:
- In the frontend, highlight the title of the element on the page you want to link to.
- Right-click on the highlighted text.
- Click on 'Inspect' (or a similar option like 'View Element Details' or 'Examine').
A window will then open on your screen showing the page's code. The highlighted text will be shown.
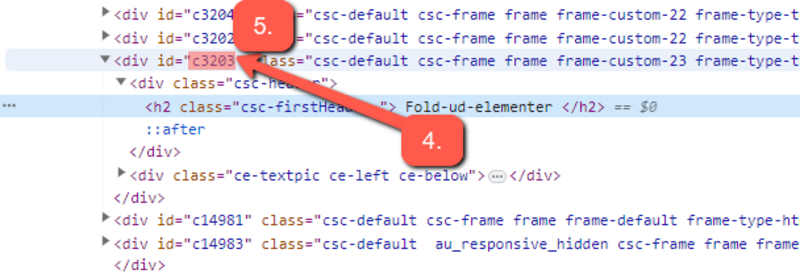
- Find the element's title (often in an <h2> tag) and look for the nearest <div> with an ID.
- Highlight and copy the ID with the prefixed 'c'. In this example, it would be 'c3203'.
Now, add #c3203 to the end of the page's URL. In this example, the page we don't have backend access to is https://typo3.au.dk/optimer-webindhold/responsivt-design/opbygning-af-sider, and the final link to element ID 3203 on the page would be https://typo3.au.dk/optimer-webindhold/responsivt-design/opbygning-af-sider#c3203.
Cleaning formatting from other sources (Word, PDF, Web)
Cleaning formatting from other sources (Word, PDF, Web)
When you copy text from other sources, such as Word, your email, a PDF file, or another website, the copied text will typically retain its original formatting. If you don't clean the text of this foreign formatting, it may appear on your page and override the AU design. This formatting can also disrupt search engine optimization. You can ensure that the original formatting doesn't carry over by using Ctrl+Shift+V when pasting copied text. You can also remove original formatting by selecting the text and clicking the 'Remove formatting' icon (the Tx icon).
You can check the HTML code using the '<> Source' button ('Toggle HTML view on/off') to see if the text is properly cleaned. Alternatively, you can paste the copied text into a program like Notepad first, which will remove all formatting. Then, copy the text from Notepad into TYPO3's text editor.