Powermail
The purpose of a web form is to standardize the collection of information from a user or colleague. In TYPO3, a web form (mail form) is a Powermail element. It is often used for purposes such as registrations, applications, guest registrations, etc. Note that a Powermail consists of two parts, which is important to remember if you need to copy, move, or translate your form.
- A plugin, where you define the recipient's and sender's email addresses for the staff members who will handle the collected information.
- A form, where you create fields for items such as the user's name and email, and possibly a field for consent.
This guide explains the standard functionality. There are additional options available, which you can get help with from your websupport, if you need it.
Create powermail
Create powermail
Before you start, please be aware of the following:
- You cannot copy an existing Powermail element and edit the copy for reuse. The reason is that the copy uses the same form as the original, so editing the copy also edits the original. In other words, a copy acts as a reference between two forms. However, you can copy the actual Powermail form itself. See the guide for details.
- If you move your Powermail element, the Powermail form will remain stored on the page where it was originally created. This means that you risk the Powermail form being deleted if the page is deleted. Therefore, remember to move both the Powermail element and the Powermail form. See the guide for details.
To create a new Powermail form:
- Go to the page where you want to place your Powermail form.
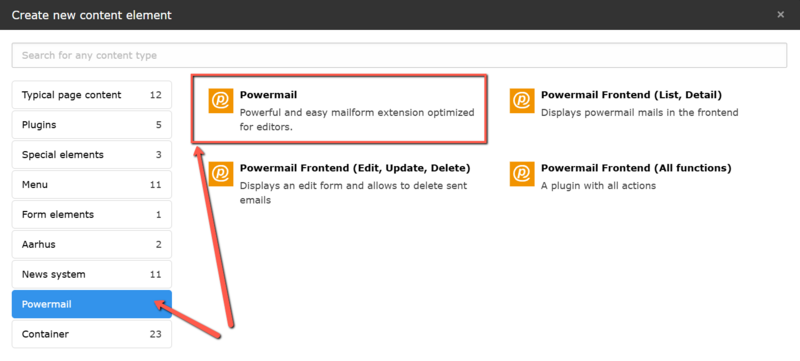
- Add a new content element.
- Select the 'Plugins' tab.
- Choose the 'Powermail' element type.
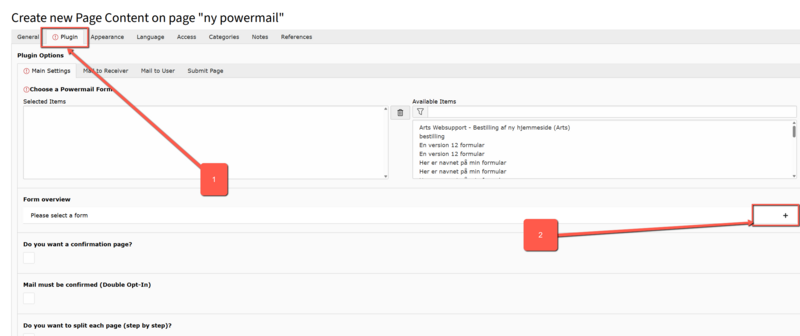
The element is inserted, and you now need to create the Powermail form itself:
- Go to the 'Plugin' tab.
- Create a new form by clicking on the '+.'
Name your form so that you can find it again later. Create and name the first page of your form. Click 'Save' and close.
- Under Primære indstillinger (Main settings) finder du din formular under listen Available Items.
Her kan du se samtlige oprettede formularer, men det er din egen, du skal vælge, med mindre du ønsker at bruge præcis samme formular på to forskellige sider.
2. Vælg din formular, og tryk Gem og luk.
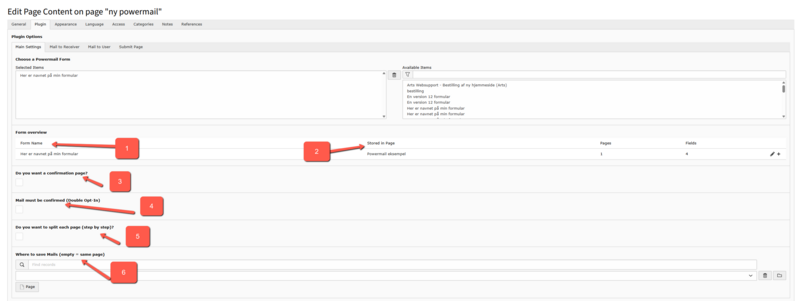
Open the editing of your Powermail element. You can now configure the general settings as described below:
- Shows which form is being used in the Powermail element. You can access the form editing by clicking on the title.
- Indicates which page your Powermail element is stored on.
- Should users be required to confirm the entered data before submitting the form?
- Should the user confirm their email? This “Double Opt-In” option must not be selected if you in the form ask the user to attach a file.
- If your form needs to contain many data fields, it may be a good idea to divide your form into multiple pages.
- Fill in this field if the submitted data needs to be saved on a different page than the one where you created your Powermail form.
Create fields
Create fields
The purpose of the form is to meet your needs as the sender, but also ensure that it is understandable for users. Consider whether you truly need all the information you are asking users to provide, or if you can eliminate some fields. If the form becomes too long and complicated, it may lead users to reach out with questions and not provide the benefit you might have expected.

- Pages are your way to create visual separations in the form. If you have chosen a multi-step view, this will be a division of the pages. Click 'Create new page' to add a new one. Each page must have a name, and there must be at least one page in a form.
- Fields are the input fields in your form, created on the actual pages. Click 'Create new field' to add new ones.
- Field Types: You need to define everything in the form yourself, so you must create all fields, including a button to submit the form. See the different options for field types in this sample form. Each field requires different information, and when you select a new field type, TYPO3 will automatically load the necessary field details. This often means that it collapses the sidebar tree, and you will need to find the field again.
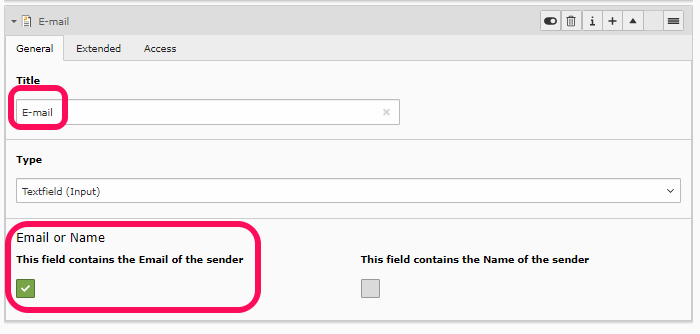
- Remember to specify which field contains the user's email address. For the Powermail to work and correctly send the form with the appropriate information, user's email must be specified.

Under each field in the 'Advanced' tab, you have the option to make additional settings for the field:
- Should the field be mandatory, meaning the form cannot be submitted until it is filled out correctly.
- Under 'Validation,' you can specify the type of content the user should enter in the field, such as only numbers or letters.
- If a help text is needed for a field, you can add it under 'Description.' In the frontend, this is indicated by an 'i' after the field name.
- Each field has a 'Variables' section that can be used when setting up automated emails for the sender and recipient.
*The 'Layout' function is not currently in use.
Note: For fields where the user needs to enter their email address, it is essential that the field is set as a mandatory field with the 'Email' validation to ensure Powermail sends correctly. An email field marked as 'This field contains the Email of the sender' MUST be marked as a Mandatory Field in the 'Advanced' tab if a confirmation email is to be sent to the user. If the user should NOT receive a confirmation email, the 'Sender' tab (Mail to user) MUST NOT be filled out.
Mail to receiver
Mail to receiver
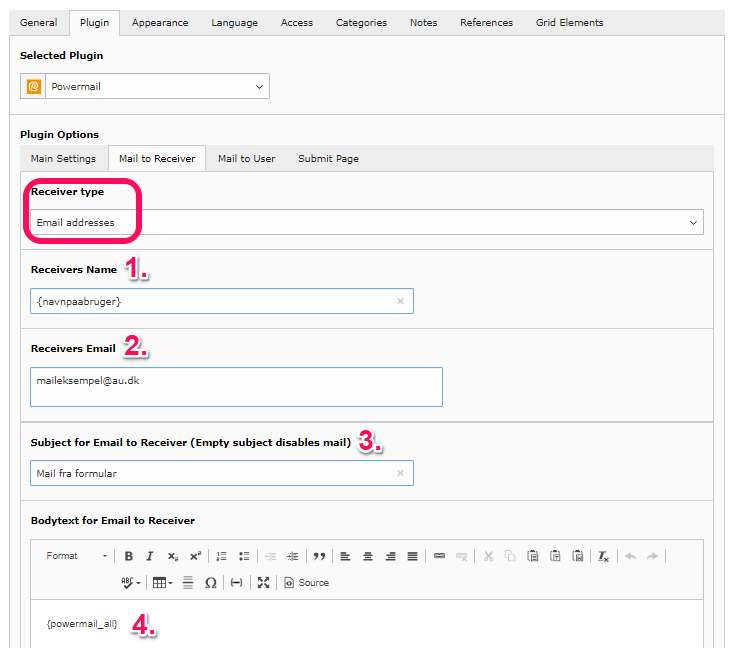
If you wish to receive an email when a user has filled out and submitted the form, you need to complete the following four items under 'Mail to Receiver.' You can find this tab under the settings for the plugin itself.
- User's name. Here, you can use the variable from the field where the user has entered their name. See Find a fields variable.
- Enter the email address that should receive notification when the user submits the form.
- Enter the subject for the email you will receive when the user submits the form. Note: This field must be filled out before Powermail will send the email.
- Here you can write a message to yourself about which data you are receiving. You can set which data you want to see in the email by inserting the variables of different fields. By entering {powermail_all}, all fields in your Powermail form will be displayed in the email.
Mail til user
Mail til user
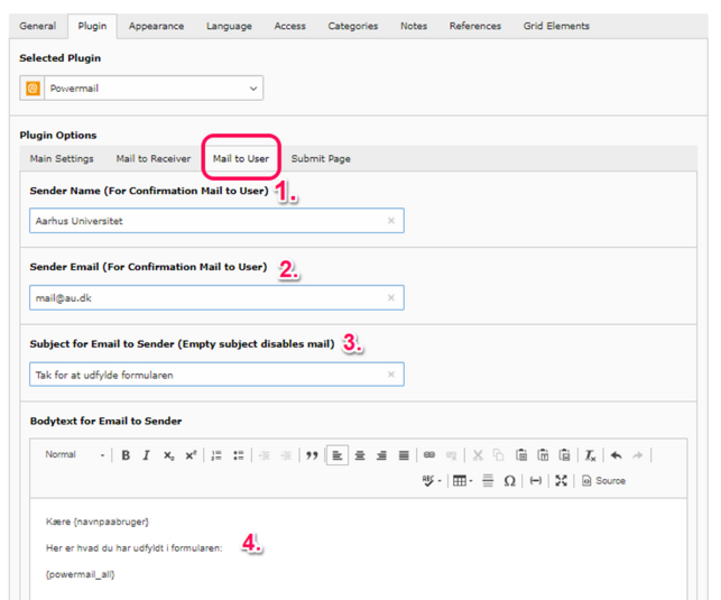
If you want users to receive an email (confirmation email) after they have filled out and submitted the form, you need to complete the following four points under Mail to User. Note: If the user should NOT receive a confirmation email, the Sender tab (Mail to user) should NOT be filled out.
- Here you enter the name that will appear as the sender of the email.
- Here you insert the email address of the person who will appear as the sender of the email to the user.
- Here you enter the subject of the email that the user will receive. Note: This field must be filled out before Powermail will send the email.
- Here you can write a message to the user as a confirmation of the completed form. You can customize the data you want to include in the email by inserting the variables of the various fields. By using {powermail_all}, all fields in your Powermail form will be shown in the email. See Find a fields variable.
Note: It may be a good idea to include a text in the form stating that the user will receive a confirmation email once they have filled out and submitted the form. This way, the user is aware that something may have gone wrong in the process if they do not receive the email. If you want to ensure that the user has read the information about the confirmation email, you might consider adding a mandatory checkbox in the form where the user must confirm that they have read it.
A suggestion for the text could be:
This form will be sent to [insert name of unit or functional mailbox, e.g., AU IT] when you click [insert the text you have chosen for the submit button, e.g., Send Registration]. You will subsequently receive a copy of your [insert name of the function of the form, e.g., registration] via email as confirmation that your [insert name of the function of the form, e.g., registration] has been received. If you do not receive a confirmation email, your [insert name of the function of the form, e.g., registration] has not been registered. Remember to check your spam filter/junk mail folder to see if the email may have ended up there.
Submit page
Submit page
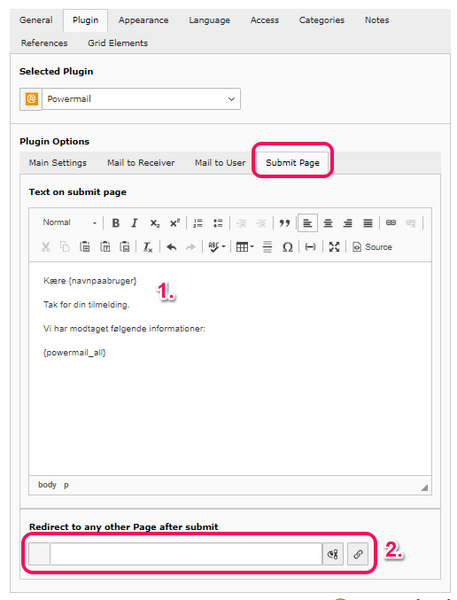
The Submit Page is the information the user is directed to after they click Submit on the form. There are two options for selecting a confirmation page.
- If you want to use the same page as the one where the Powermail form is located, you should fill out the Submit Page field. This is done just like you would with a regular text element. You can personalize the confirmation by using your field variables, e.g., Dear {navnpaabruger}.
- If you prefer to redirect the user to a different confirmation page, you can enter the link to the desired page here. Note: You cannot do both (1+2). When a link to another page is set, that page will be used, and you should create your confirmation text there, e.g., 'Thank you for your registration. You will hear from us as soon as possible.
Find a field’s variable
Find a field’s variable
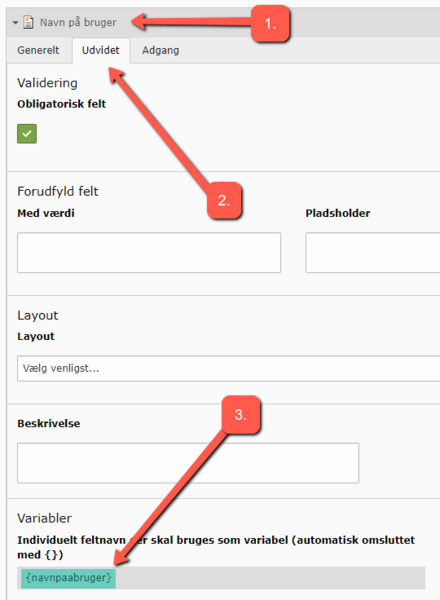
In your Powermail element, you can reference the collected data (e.g., the user's name and email) using the field's variable.
- To find a field's variable. Open the form and select a field, such as "User Name."
- Go to the Extended tab.
- Copy the field's name under Variables (e.g., {username}).
Translate powermail to another language
Translate powermail to another language
We recommend that you complete and test your Powermail form in the default language before starting the translation. Also, remember that a Powermail form consists of both a plugin and a form with fields. Both the plugin and the form need to be translated. This can be done either from the List module, as described first, or from the Page module, as described last.
Translate plugin and form in list view
- 1.We assume that the page itself has already been translated. If not, see how to translate your page.
- 2. Go to List view in the left menu.
- 3. Find the Powermail form in List view under Forms.
- 4. Click on the English icon under Localize to.

You can now translate the title of the form. After that, you can view and edit the translated version of the Powermail form in List view.
Remember, you also need to translate the plugin itself in the same way!

Add field and translate
Add field and translate
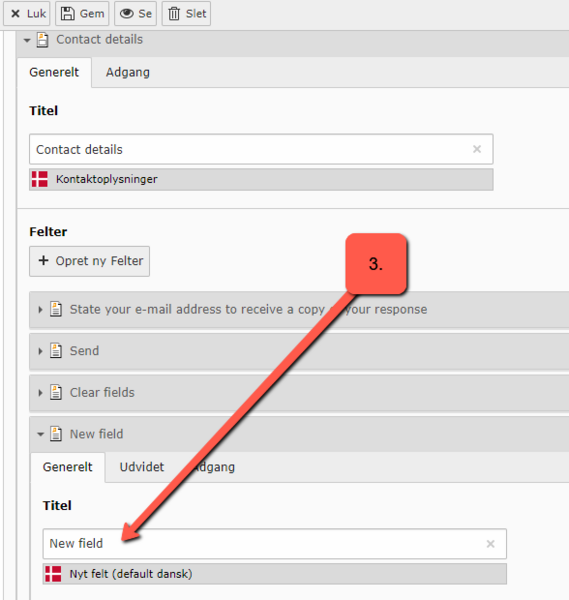
We assume that your Powermail has been translated according to the guide "Translate Powermail to another language" above. If you want to add a new field, it must be done in the form's original language (in this example, Danish). You will then translate your new field in the form's translation as shown below. Note: Avoid translating via List view.
- TYPO3 has automatically identified the new Danish field, but it has not been translated yet.
- Click on "Translate all elements." This button appears in the English form because you added a field in the original language (Danish).
- Now name the translated field and click "Save."

Copy a powermail form
Copy a powermail form
If you want to reuse an existing Powermail form and just modify a few of the fields, you should copy the Powermail form itself.
- Go to the page where the Powermail form you want to copy is saved.
- Switch to List View in the left menu.
- Scroll down until you reach Forms. Here you can find the Powermail form used on the page in the Powermail element.
- Click the icon next to the form and select Copy.

- Now go to the page where you want to use the copied Powermail form.
- Switch to List View in the left menu.
- Insert the Powermail form by clicking the insert icon at the top.

A copy of the Powermail form has now been created on the page where the new Powermail form has also been saved. It is a good idea to rename the Powermail form so you can find it again when setting up the Powermail element.
Note: If you copied a Powermail form with a language layer, the translation will automatically be included. However, you risk the language layer not being used in your new Powermail form if you rename the form. There is a workaround:
- Ensure that the page where the copy will be inserted also has an English page version (or another language layer).
- Make sure to rename both the Danish and English versions of the form copy.
Move a powermail form
Move a powermail form
If you need to move a Powermail form to a different page than where it was originally created, you should move the Powermail form itself and the plugin.
- Locate the page where the Powermail form is currently situated.
- Go to the List view.
- Find the form and click on the cut tool.
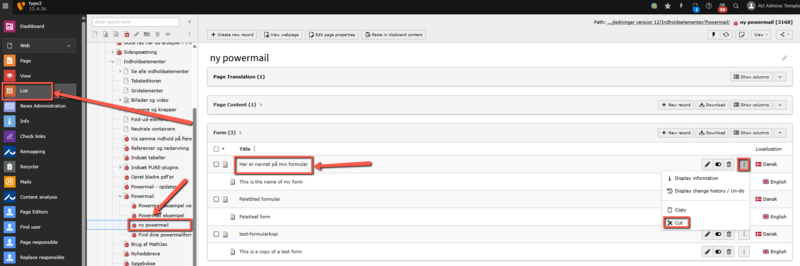
Navigate to the page where you want to place the Powermail form and paste it there. (Look for a small icon "Paste clipboard content" at the top of the page.)
Also, remember to move the Powermail plugin itself to the page where you are placing the form. You can do this either before or after moving the form (steps 1-4), in either Page or List view.
All collected data and any language versions of the Powermail form will be automatically moved to the new page and stored there.
Responsive forms - tooltips
Responsive forms - tooltips
Tooltips are the small messages that appear when you hover over something on a website. They are designed to provide additional information about the specific element. If you have filled in the Description field for a form field in the backend, the text will appear as a tooltip next to the 'i' in your form on the frontend.
Powermail forms are responsive by default, adapting to the platform they are displayed on. However, on mobile devices, you cannot hover over the 'i' in your form. If you want tooltips to be displayed in your Powermail form regardless of screen size, you should follow these steps. The tooltips will then appear when you click on the 'i'.
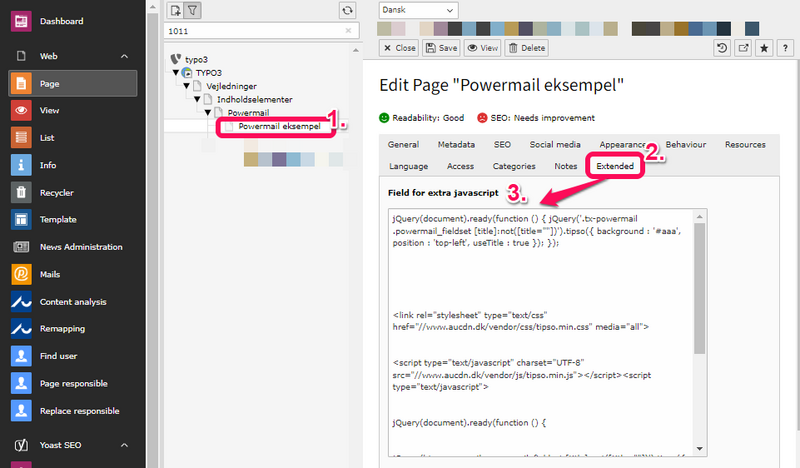
- Go to the page properties of the page where the Powermail form is located.
- Select the Extended tab.
- Insert the following in the Field for extra JavaScript:
<link rel="stylesheet" type="text/css" href="//cdn.au.dk/vendor/css/tipso.min.css" media="all">
<script type="text/javascript" charset="UTF-8" src="//cdn.au.dk/vendor/js/tipso.min.js"></script>
<script type="text/javascript">
jQuery(document).ready(function () {
jQuery('.tx-powermail .powermail_fieldset [title]:not([title=""])').tipso({
background : '#777',
position : 'top-left',
useTitle : true
});
});
</script>
Storage of form data in TYPO3
Storage of form data in TYPO3
This is only relevant if the data is not sensitive personal data!
In such cases, the data must not be stored in TYPO3 but should be collected via HTTPS and sent securely to the appropriate recipient.
To avoid manually deleting form data, you can create separate subpages (which are not visible in the frontend) that can be used as containers for submitted form data. Then, you can configure the Powermail form to store data on such a page. By changing the pointer to a new page once you have finished processing the submitted data, you can easily delete old data by deleting the subpage.
This way, you avoid spending time (as mentioned in the previous section) deleting 25 records at a time.
Find and export form data
Find and export form data
Data is sent to the recipient and is generally NOT stored in TYPO3. If there is a GDPR agreement specifying that data should also be temporarily stored in TYPO3 (during processing), you can extract this data using the following steps:
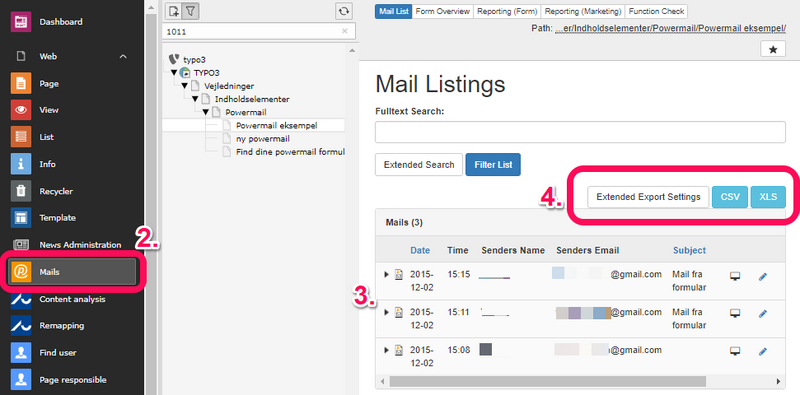
- Go to the page where your Powermail data is stored.
- Select Powermail (Mails) from the left menu.
- You will automatically see a view of the registered data as shown below.
- You can also export the data, which can be done from the Powermail menu item. Here, you have the option to export as .csv and .xls.
Delete form data in TYPO3
Delete form data in TYPO3
You can only delete a maximum of 25 entries at a time.
To delete form data:
- Go to the Powermail backend module (Mails).
- To select the entries, click on the top [+] icon on the far right.
- At the bottom, there are now two icons: Clicking on the eye icon will hide the data without deleting it. However, clicking on the trash can icon will delete the data from your form.
