Edit page properties
In the page properties, you can hide a page, make it invisible in the left menu, set access restrictions, fill in metadata, change the page design, display content from other pages, and much more.
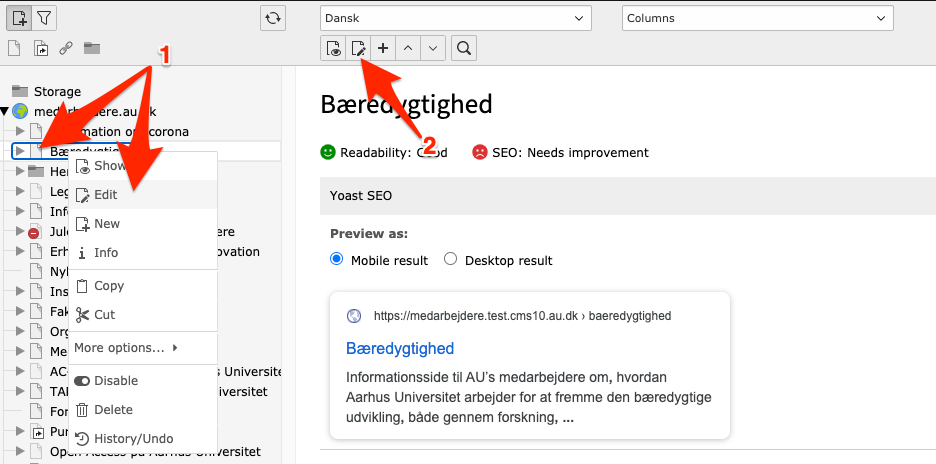
You can access the page properties in the backend in two different ways:
- Click on the icon next to the page and select Edit from the menu.
- Click on Edit page properties in the toolbar at the top of your screen (the icon with the pencil).
In the following, we will go through the different tabs under page properties.
General
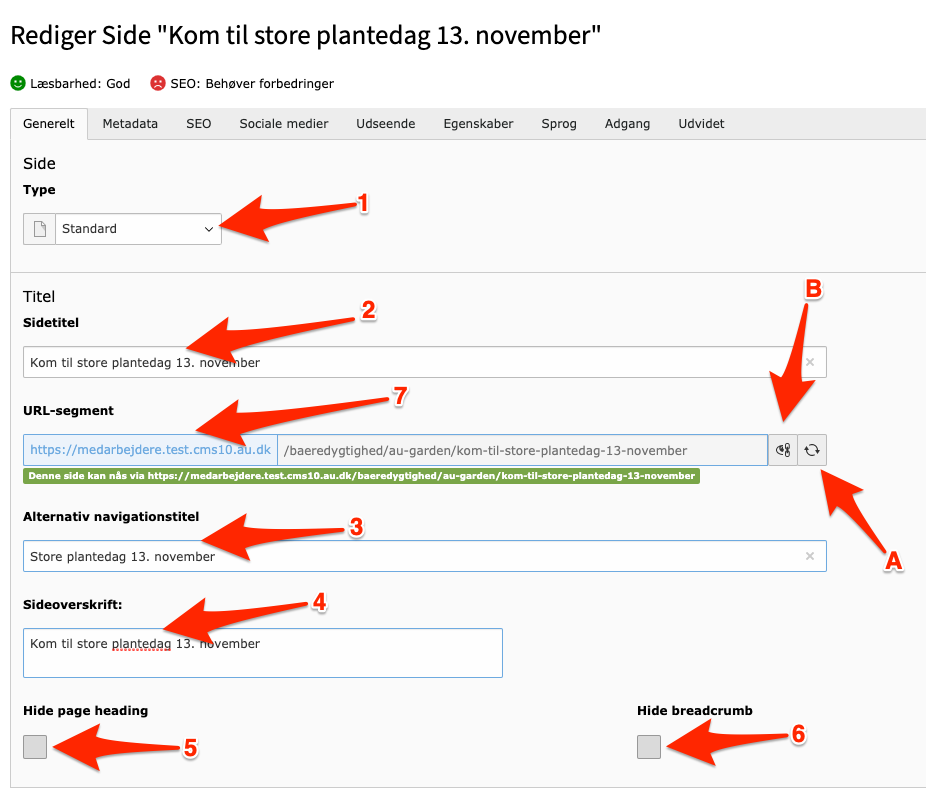
- Type – Here, you can choose the type of page. It will typically be a Standard Page, but you can also select Shortcut, Link to External URL, or System Folder.
- Title – Give the page a meaningful name that includes one or more keywords from the page's content. Avoid using periods, as some browsers may not interpret them correctly. Note that Google only displays the first 65 characters of the page title, including spaces. The page title appears in three places: in search results, on social media, and in browsers (tabs and bookmarks).
- Alternative Navigation Title – Usually, the page title is displayed in the site's menus, but you can override this by filling in the 'Alternative Navigation Title' field. If the page title is very long, it may be useful to use an alternative navigation title for the menu.
- Page Header – Typically, the page title is also used as the header on the page in the frontend. By filling in the 'Page Header' field, you can give the page a header that differs from the page title.
- Hide Page Heading – By checking this box, you can hide the page's heading. This can be practical if, for example, there is a graphic element at the top of the page (such as a focus area) that serves as a heading. However, be aware that there must be another H1 heading on the page when hiding the main heading.
- Hide breadcrumb – By checking this box, you can hide the breadcrumb on your page. We generally do not recommend hiding the breadcrumb, as it helps users navigate your page. However, in certain cases, it may be useful to have this option.
- URL-segment – Here, you can choose between two different methods A or B. Remember to recalculate the URL for both languages if the page is translated.
A) Calculate URL automatically based on the page's title and location in the site tree: This is the most commonly used method, where TYPO3 automatically generates a URL based on the page's location in the site tree and its title.
B) Manually Entered URL: This method is suitable if you want a shorter URL for your page. By using the manual method, you can decide what will appear after the domain. Use this option with caution, as it may make it more difficult for users to navigate the website if the URLs do not reflect the page's location on the site. You can read more about creating short URLs.
Be aware that TYPO3 automatically creates a redirect from the original URL to the new one if you rename it. Therefore, there is no risk that a user will receive an error message if they try to access a page via a previous URL.
Metadata
Here you can provide information regarding page ownership and contact for page content, as well as fill in metatags. Metadata are data about data—information about the page's content that is not directly visible on the page but is interpreted by search engines. Search engines use metadata as part of their indexing process and to evaluate the content's relevance for searches on platforms like Google. This used to be more important, but today it is less significant as search engines increasingly prioritize visible content (such as body text, headings, and image filenames).
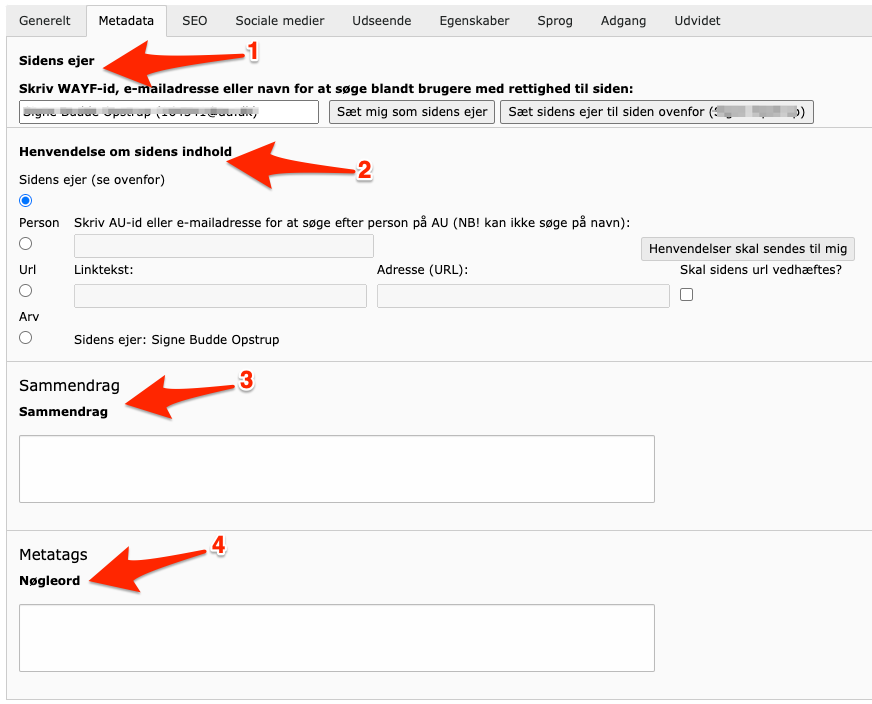
- Page Owner – Should always be an editor who has access to the page in TYPO3. The page owner is not visible in the frontend.
- Contact for Page Content – Here, you can set individuals or functional email addresses as the visible contact person on the page. The page responsible person appears in the frontend at the bottom of the page next to the date of the last revision.You can either enter an AU-ID or email address of an AU employee in the 'Person' field or choose to enter text in the 'Link Text' field and insert an email address in the 'Address (URL)' field, such as a functional email. Alternatively, you can select 'Inheritance', where a contact person for the page at a higher level in the page tree also becomes the contact for this page.
Items 3 and 4 below ('Summary' and 'Metatags') do not need to be filled out. Instead, use the SEO tab and the Yoast guide for SEO optimization.
SEO
The SEO tab is thoroughly covered in the guides on SEO – Yoast. We therefore refer to that guide for more information.
Social media
Here you can work with Open Graph tags for Facebook and Twitter Cards to optimize how your pages appear when shared on social media.
Appearance
In daily usage, we refer to the page's appearance as the page layout (template).
You can choose from the following page templates:
- With left menu, with right column
- With left menu, without right column
- Without left menu, without right column
- Without left menu, with right column
- '2016 AU Front Page' is reserved for the au.dk front page and cannot be used on pages other than au.dk.
In most cases, your page should have a left menu ('M left'), which automatically reflects the page tree. If you opt out of the left menu, you must ensure that users can navigate the site through buttons, a sitemap, or links on the pages.
Explanation of the fields under 'Appearance':
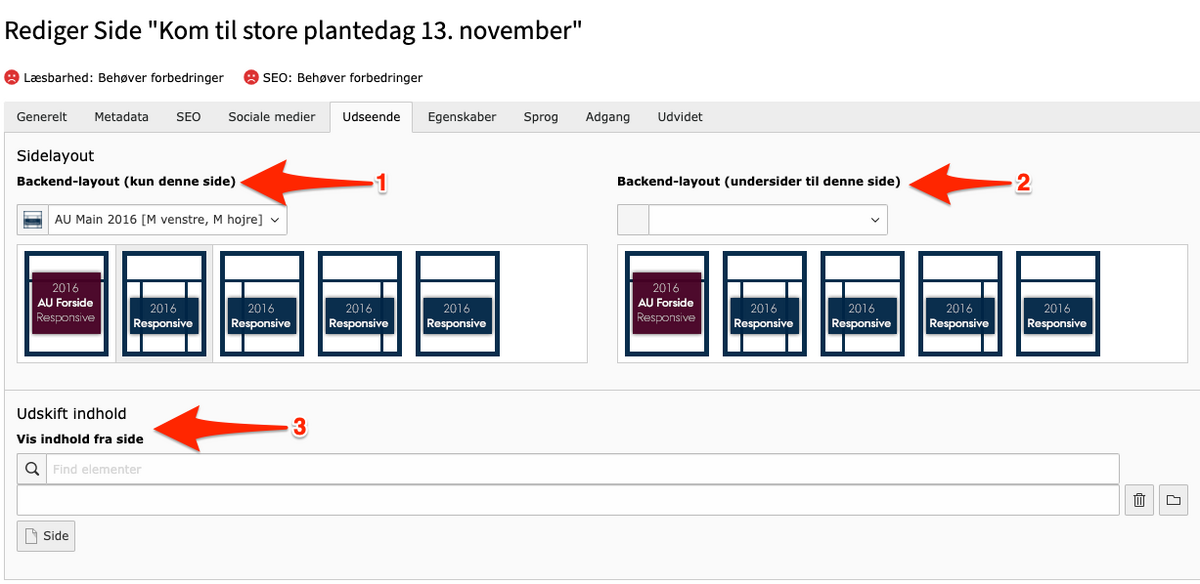
1. Backend Layout (only this page) – Here you select the page layout for the current page.
2. Backend Layout (subpages of this page) – Here you can specify the layout for the page's subpages. This can be different from the layout used on the current page. If you do not fill in this field, the layout for the current page is automatically inherited.
3. Replace Content – Here you can choose to display content from another page instead of the content currently inserted on the page. This is only possible if your TYPO3 access includes both the current page and the page from which you want to insert content. Be cautious about having the same content on multiple pages, as this is not good for SEO
Read more about choice of page layout.
Properties
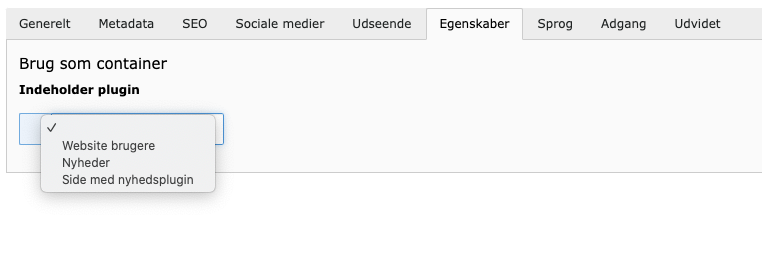
A page in the page tree is usually displayed with a paper icon. Under Properties, you can change the icon for your page. This can be useful if you want to distinguish, for example, news folders and user lists (for access-restricted pages) from your regular pages.
Expand the menu and choose the appearance you want. This will not affect the page's appearance or functionality in the frontend.
Language
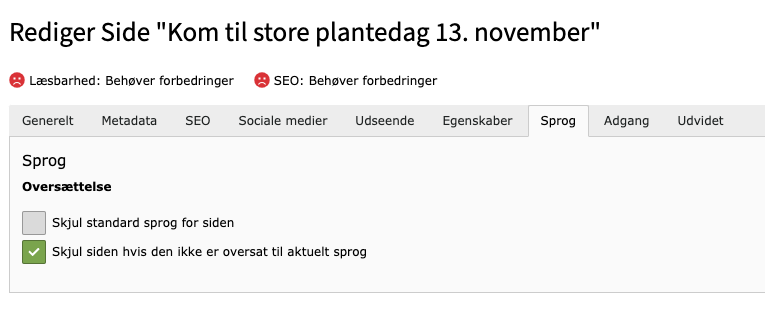
Here you can make translation settings. In most cases, the settings should be as shown in the example below.
- Hide default language for the page – Check this box if you want to hide the page in the default language while keeping a translated version of the page visible. For example, if the default language is Danish and the page is translated into English, check this box if you want to hide the Danish version.
- Hide page if not translated to current language – Checking this box ensures that a page in the default language, which is not translated, does not appear in the menu for translated pages. This option is automatically selected for pages created in the default language.
Access
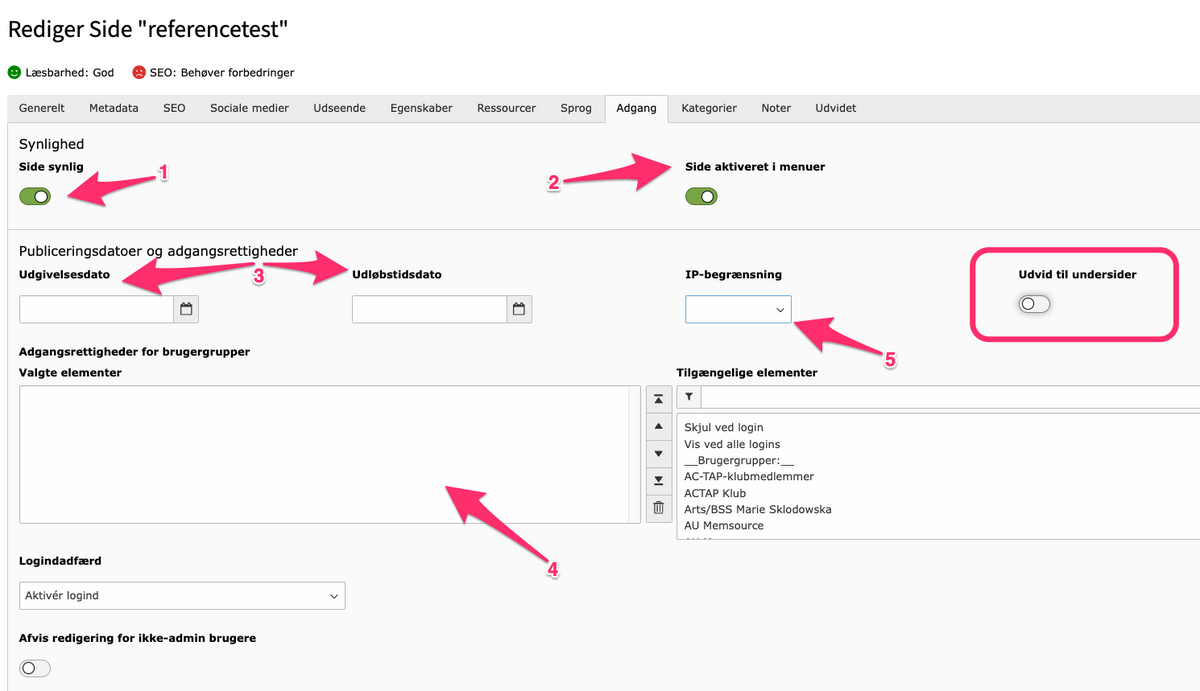
- Page Visibility – Choose whether the page should be visible or hidden in the frontend. If you are logged into TYPO3, you can still see the hidden page. Others who access a direct link to the page will encounter a 404 error/dead link. A green marker means the page is visible. Click on the marker if you want to make your page unavailable (the marker will now appear gray). Search engines do not find pages set as invisible.
- Page Activated in Menus – Choose whether the page should appear in the page’s left menu (applies to visible pages). Pages not shown in the menu are still accessible if you have a direct link to the page, but you cannot navigate to them through the menu. Search engines find visible pages regardless of whether they are shown in the menu or not.
- Publishing Dates and Access Rights – Specify the date when the page should become active and when it should be deactivated. If you leave this blank, the page is always visible. You do not need to fill out both fields. It is sufficient to only fill out the 'Expiration Date' field if the page should only be visible until a certain date.
By enabling 'Extend to Subpages,' you can choose to apply the publication and expiration date settings to the page’s subpages as well. This way, you do not have to set it manually for each individual subpage. - Access Rights for User Groups – If you want to restrict access to a page, this is where you choose which user group should have access to view the page. Read more about access restriction.
- IP Restriction – If a page should only be accessible by AU employees, you can set an IP restriction on the page. Currently, it is only possible to restrict access to the university’s IP address. This means that only those on an AU location or logged into VPN can view the page. The page will not be indexed by search engines if IP restriction is enabled.
By enabling 'Extend to Subpages,' you can choose to apply the publishing and expiration date settings to the page’s subpages as well. This way, you do not have to set it manually for each individual subpage."
Extended
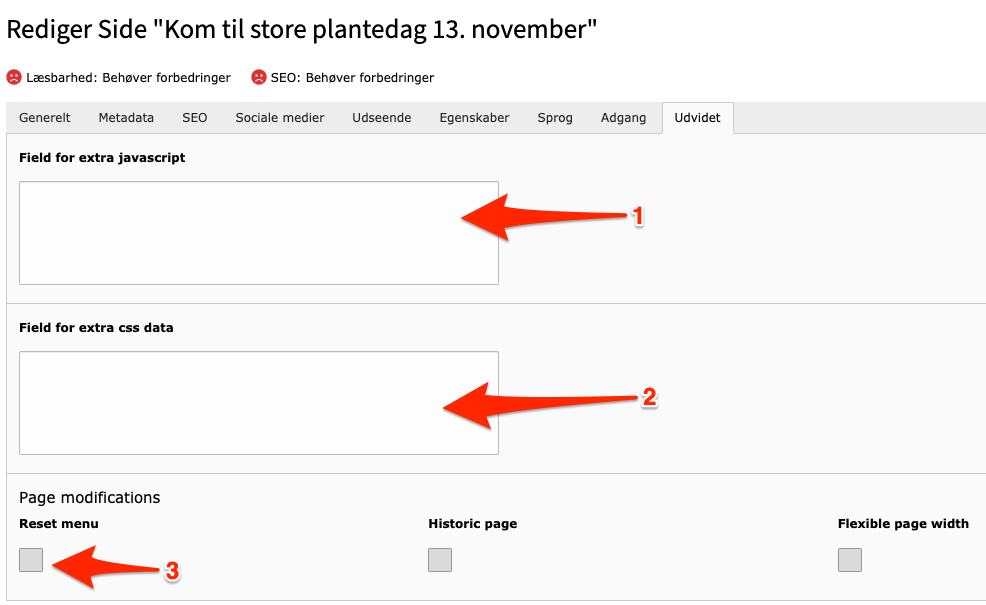
- Field for extra javascript –This field is used to add JavaScript that is not part of TYPO3, such as embedding codes for Facebook, Twitter, Instagram, and similar services. Note that codes added here will not be inherited by subpages.
- Field for extra css data – You can modify the appearance of an element by writing CSS code in this field. Note that codes added here will not be inherited by subpages.
- Reset menu – Checking this box will make this page the starting point for the left menu. The page will act as the "root" in the menu, displaying any subpages beneath it. This feature is useful for larger domains where specific major branches may benefit from having their own menu.
The functions 'Flexible page width' and 'Historic page' are not yet activated, so toggling them on or off will have no effect. When they become available, this guide will be updated with information on how to use these two functions.
